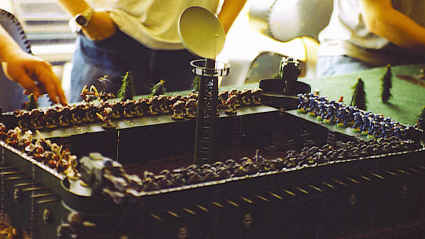
The first thing I did is cut out the shape of the hill I wanted the bunker mounted into from a piece of 1" insulation foam. I then traced this shape onto a piece of cardboard. This acts as the floor of the bunker and keeps it connected to the hill.
I then cut out a notch from the foam to accomodate the bunker. In this case it is a 3"x3" square. This starts at the very edge of the hill and goes in. Once the bunker was cut out of the hill I glued the cardboard base in place. I forgot to cover the corrugations with carboard as you can see in the picture. Don't forget to do that!!
All of the corrugated steel is made from corrugated paper. You can buy it by the roll. I got mine at a dollar store.
A 3" x3" square was glued to the carboard base to serve as the floor for the bunker. White glue was used, and it soaked the paper backing off of the corrugated paper. Clamps had to be used to keep the paper down while drying. Two strips were cut and glued along the inside of the hill; one facing out and one facing in. These formed the walls of the lower story.
Chopsticks were cut to length and superglued into each corner to support the upper level.
A 3" x 3" square of cardboard was cut for the upper level. This was centered over the posts and glued into place. Glueing the upper floor in place was a huge mistake. Now it's nearly impossible to get models into the lower level.
Corrugated paper was glued to the base of the upper floor. A thin strip was also glued around the front three side of the upper level. This would give the upper wall something to be attached to.
The surrounding wall on the upper level is constructed the same way as the wall for the lower level. An HO scale model railroad trask was used for a ladder. The rails were pulled off with a plier and then it was cut to length.
The piece was primed black (the hill brushed, the rest sprayed.) The corrugated steel was drybrushed dark green to a lighter green. The ladder and posts were painted like wood; starting with a dark brown drybrush up to a light brown. The hill was drybrushed up from dark grey to white.
Static grass was glued to the top of the hill and the piece was complete.
Just some of the models, terrain, games and other random stuff I've been working on.
Showing posts with label 40K. Show all posts
Wednesday, July 14, 2010
Two Story Fortifcation
Labels:
28mm,
40K,
Flying Lead,
Modern,
Sci Fi,
Structures,
Terrain,
Wargaming,
WWII
Tuesday, July 13, 2010
Tank Traps
Another important piece of terrain for wargames is the tank trap. They trap tanks. Or at least keep them from driving where ever they want, until the traps are destroyed. Click on pictures for a larger view.
A standard scenario calls for up to six sections of traps so I created six. These were based on 3" x 6" sections of foam core (no cardboard today, kids.)
The hedgehogs were created by glueing plastic "I" beam rods together in an "X" shape . I mounted three traps per base. After the traps were built, they were hot glued to the bases. I then primed them in a oxide red.
I used these traps hours after I had primed them, and three of them broke off the base during transport to the local gaming shop. two more broke off while we played. Hot glue was NOT the thing to use here. When I got back home, I tugged at each trap still attached to its base to see if it would come off. If it did, I superglued it back on. After making these repairs I covered the bases in the PVA mix and covered them in sand. As soon as the glue was dry, the pieces were basecoated black (I didn't care for the red oxide color.) Painting was done by drybrushing the traps silver, and drybrushing the bases in a medium brown and a tan. I was tired of looking at these things and just wanted them done.
All I need to do is seal them, which I will do with a spray sealant. I just hope the sand won't start breaking off. If it does, I'll coat the bases in PVA, just like my flocked pieces.
These dragon teeth style tank traps were made from plaster poured into an ice cube tray. Once the plaster cured they were knocked out of the tray and attached to strips of foamcore with white glue. They were then primed black and drybrushed dark grey to light grey to white. A sickly green static grass was mixed with some dried tea leaves and applied to the base with white glue.
A standard scenario calls for up to six sections of traps so I created six. These were based on 3" x 6" sections of foam core (no cardboard today, kids.)
The hedgehogs were created by glueing plastic "I" beam rods together in an "X" shape . I mounted three traps per base. After the traps were built, they were hot glued to the bases. I then primed them in a oxide red.
I used these traps hours after I had primed them, and three of them broke off the base during transport to the local gaming shop. two more broke off while we played. Hot glue was NOT the thing to use here. When I got back home, I tugged at each trap still attached to its base to see if it would come off. If it did, I superglued it back on. After making these repairs I covered the bases in the PVA mix and covered them in sand. As soon as the glue was dry, the pieces were basecoated black (I didn't care for the red oxide color.) Painting was done by drybrushing the traps silver, and drybrushing the bases in a medium brown and a tan. I was tired of looking at these things and just wanted them done.
All I need to do is seal them, which I will do with a spray sealant. I just hope the sand won't start breaking off. If it does, I'll coat the bases in PVA, just like my flocked pieces.
These dragon teeth style tank traps were made from plaster poured into an ice cube tray. Once the plaster cured they were knocked out of the tray and attached to strips of foamcore with white glue. They were then primed black and drybrushed dark grey to light grey to white. A sickly green static grass was mixed with some dried tea leaves and applied to the base with white glue.
Labels:
28mm,
40K,
Accessories,
Flying Lead,
Modern,
Sci Fi,
Terrain,
Wargaming,
WWII
Styrofoam and Wall Filler Buildings
These two pieces are some of my earliest attempts at making terrain. They use some pieces of styrofoam glued together and some wall filler material to create a quick and easy structure for wargaming. The first piece is a simple building. It was created by using two pieces of styrofoam used to package some kind of electronic device, but I can't remember what. The two halves were simply glued together with PVA and allowed to dry. The outside was then covered in some pre-mixed wall filler compound and slightly smoothed out.
Once the filler was dry, it was sanded down to get rid of any sharp edges or peaks that might be on the piece. A door was made in the front out of card and a handle was taken from a tank model. A thing was glued onto the piece and a couple of straws were also glued on as exhaust ports.
The building was brushed black and drybrushed a dark grey, light gray and finally white. The door, exhaust ports and thing were drybrushed silver. This piece is so stable and strong it wasn't even based.
The second piece is a small bunker I built from offcuts of styrofoam from making hills. It is based on a square of foamcore with masking tape around the edges to hide the foam in the foamcore. The bunker itself is made of "bricks" of styrofoam glued to the base with a removable roof.
The bunker was also coated in wall filler, but a brush was used after application to give the bunker a formed concrete look, much like that on the highways and interstates (at least here in Minnesota). Once the filler was dry, the bunker was painted black, and drybrushed from dark grey to white, just like the above piece.
Once the filler was dry, it was sanded down to get rid of any sharp edges or peaks that might be on the piece. A door was made in the front out of card and a handle was taken from a tank model. A thing was glued onto the piece and a couple of straws were also glued on as exhaust ports.
The building was brushed black and drybrushed a dark grey, light gray and finally white. The door, exhaust ports and thing were drybrushed silver. This piece is so stable and strong it wasn't even based.
The second piece is a small bunker I built from offcuts of styrofoam from making hills. It is based on a square of foamcore with masking tape around the edges to hide the foam in the foamcore. The bunker itself is made of "bricks" of styrofoam glued to the base with a removable roof.
The bunker was also coated in wall filler, but a brush was used after application to give the bunker a formed concrete look, much like that on the highways and interstates (at least here in Minnesota). Once the filler was dry, the bunker was painted black, and drybrushed from dark grey to white, just like the above piece.
Labels:
28mm,
40K,
Flying Lead,
Modern,
Sci Fi,
Structures,
Terrain,
Wargaming,
WWII
Statue Bunker
This piece is terrible. I post it now only for completeness, and because some of the technique is interesting.
This was another piece created for my desert terrain set. It is also another piece created from an X-Men playset. I wish more K-Marts would have a 90% off going out of business sale. This tends to be a favorite piece when people see my terrain. Components used in the construction of this piece are:
Foamcore Textured Spraypaint
Cardboard for the base Sand for ground cover
Cross Stitching grid sheet Netting
Styrofoam/ Stryofoam ball Toothpicks
The first thing to do was to disassemble the playset. It was a Statue of Liberty head with a bunch of crazy anti-mutant traps and gizmos inside it. Pretty stupid, actually. I can see why I paid 50 cents for it. I reduced the playset to just the face of the statue and cut it in half at an angle. I then used a dremel tool to distress the features slightly. Using the statue as a guide I cut a base from double corrugated cardboard and sealed the edges with masking tape. The statue was hot glued to the base.
I then used a textured spraypaint (I can't remember the brand or type) and covered the piece heavily. After waiting for eons for it to dry, I base coated it in a brown. Then I highlighted to a light brown into a cream into a light cream color.
The interior floors were made from foamcore sealed with masking tape, and then Cross Stitching plastic (aka Granny Grating) was cut to size and superglued on. a block of styrofoam was used to support the lower floor, and a frame was made out of toothpicks to support the upper floor. After construction, these platforms were spraypainted black (the styrofoam was brushed black first, of course) and everything was drybrushed in a silver. The platforms were glued into place inside the statue.
The base was then coated in a water/PVA mix and then the piece was covered in fine sand. When the glue dried the excess was removed and the process was repeated again.
The cactus was made from a small styrofoam ball used in floral arrangments with toothpicks jammed in and glued into place. The cactus was then painted green, washed black and the spines were painted red.
This was another piece created for my desert terrain set. It is also another piece created from an X-Men playset. I wish more K-Marts would have a 90% off going out of business sale. This tends to be a favorite piece when people see my terrain. Components used in the construction of this piece are:
Foamcore Textured Spraypaint
Cardboard for the base Sand for ground cover
Cross Stitching grid sheet Netting
Styrofoam/ Stryofoam ball Toothpicks
The first thing to do was to disassemble the playset. It was a Statue of Liberty head with a bunch of crazy anti-mutant traps and gizmos inside it. Pretty stupid, actually. I can see why I paid 50 cents for it. I reduced the playset to just the face of the statue and cut it in half at an angle. I then used a dremel tool to distress the features slightly. Using the statue as a guide I cut a base from double corrugated cardboard and sealed the edges with masking tape. The statue was hot glued to the base.
I then used a textured spraypaint (I can't remember the brand or type) and covered the piece heavily. After waiting for eons for it to dry, I base coated it in a brown. Then I highlighted to a light brown into a cream into a light cream color.
The interior floors were made from foamcore sealed with masking tape, and then Cross Stitching plastic (aka Granny Grating) was cut to size and superglued on. a block of styrofoam was used to support the lower floor, and a frame was made out of toothpicks to support the upper floor. After construction, these platforms were spraypainted black (the styrofoam was brushed black first, of course) and everything was drybrushed in a silver. The platforms were glued into place inside the statue.
The base was then coated in a water/PVA mix and then the piece was covered in fine sand. When the glue dried the excess was removed and the process was repeated again.
The cactus was made from a small styrofoam ball used in floral arrangments with toothpicks jammed in and glued into place. The cactus was then painted green, washed black and the spines were painted red.
Skull Piles
These skull piles are hydrostone pieces I picked up at discount from an unknown manufacturer a long time ago. The skulls were simply inked with a Flesh Wash and the ground inked with a Brown Ink. The skulls were then drybrushed a tan to Bleached Bone to a white. The ground was drybrushed a dark brown to a light brown to tan. A bit of my super secret ground cover mix* was attached with white glue and they were done.
* Super secret ground cover mix is Woodland Scenics green fine turf, Woodland Scenics dark green static grass, Woodland Scenics light green static grass, Woodland Scenics light brown fine turf and ground, dried tea leaves. Mix according to taste.
Labels:
28mm,
40K,
Accessories,
Flying Lead,
Model Kit,
Modern,
Scenery,
Sci Fi,
Song of Blades and Heroes,
Terrain,
Wargaming,
Warmachine,
WHFB
Razorwire
Razorwire is a basic piece of terrain necessary in many scenarios. It's also nice to put on the field to try and slow your opponent down!
I built six sections of razorwire, the maximum number of sections needed in a scenario. I used corrugated cardboard as the base, cutting it to 1" x 6". I then used masking tape to cover the edges and hide the corrugations.
My first attempt at razorwire was done like this:
I first cut short pieces of chopsticks to be used as the posts to mount the razorwire on. I then wrapped a heavy gauge length of floral wire around a medium sized marker. After this coil was created, I stretched it out and glued it to the posts on the cardboard. I then used a very light gauge wire to tie the razorwire to the posts. Once the glue was dry, the piece was sprayed with a black undercoat. The posts were drybrushed, starting with a dark brown and working up to a tan; the razorwire was drybrushed silver and given a rusty wash of burnt sienna.
After painting, two layers of flock were glued to the base.
After completing this single section, I bought 110 barbed wire fence pieces on ebay. They were cheap plastic ones from an old green-and-tan army man set. I used these to finish off my razorwire sections. They were cut to size and modified to fit onto a 6" long base and then cleaned of the excess flash and mold lines.
I then glued them to the base, primed black, and painted them as I did the other first section I made. The base was finished the same way.
It was actually faster to make the razorwire sections from scratch due to the modifications made to the purchased razorwire and the huge amount of flash on them. The purchased razorwire sections look much better than the home made piece, in my opinion.
I built six sections of razorwire, the maximum number of sections needed in a scenario. I used corrugated cardboard as the base, cutting it to 1" x 6". I then used masking tape to cover the edges and hide the corrugations.
My first attempt at razorwire was done like this:
I first cut short pieces of chopsticks to be used as the posts to mount the razorwire on. I then wrapped a heavy gauge length of floral wire around a medium sized marker. After this coil was created, I stretched it out and glued it to the posts on the cardboard. I then used a very light gauge wire to tie the razorwire to the posts. Once the glue was dry, the piece was sprayed with a black undercoat. The posts were drybrushed, starting with a dark brown and working up to a tan; the razorwire was drybrushed silver and given a rusty wash of burnt sienna.
After painting, two layers of flock were glued to the base.
After completing this single section, I bought 110 barbed wire fence pieces on ebay. They were cheap plastic ones from an old green-and-tan army man set. I used these to finish off my razorwire sections. They were cut to size and modified to fit onto a 6" long base and then cleaned of the excess flash and mold lines.
I then glued them to the base, primed black, and painted them as I did the other first section I made. The base was finished the same way.
It was actually faster to make the razorwire sections from scratch due to the modifications made to the purchased razorwire and the huge amount of flash on them. The purchased razorwire sections look much better than the home made piece, in my opinion.
Labels:
28mm,
40K,
Accessories,
Flying Lead,
Modern,
Scenery,
Sci Fi,
Terrain,
Wargaming,
WWII
Outpost
Here are some quick pictures of an outpost I built. It's based on a 20" x 30" sheet of foamcore. The battle being played is 2,000 points of Space Marines Vs. 4, 000 points of Tyranids. (Note: This is from 2004 or earlier.)
The picture on the left shows when things became ugly. The Lictor hopped the wall and engaged this Force Commander(Center). On the same turn, Old One Eye (left)popped out of the ground and took out the radar tower the next turn. A squad of 9 flying Warriors (Right) also entered the outpost on the same turn as Old One Eye. The next turn they assaulted the Chaplin on the Northern walkway.
The picture on the right shows the final matchup. The Chaplin took out the 9 Warriors, and the walls of the fort began to tumble down from the force of the Tyranid onslaught. The Chaplain and the few remaining Space Marines beat a hasty retreat to the nearest board edge (in order to win the scenario), but a brood of Genestealers and a Carnifex chewed everone to pieces. The Chaplain broke away, and when he was a mere 2" from the board edge, the winged Hive Tyrand rolled an 16" sweeping advance, catching the Champlain and ending his exsistance.
And yes, those large black things on either side of that Hive Tyrand are wings. His wingspan when the wings were completely outstretched was about 3 times his height. He also weighs about 3 pounds. He comes apart at the torso so his base can actually be engaged in close combat. He can give a squad of Space Marines a big "hug". He doesn't belong to me. He DOES belong to my brother, which is almost as good as belonging to me. But not quite.
This web page is in no way affiliated with or endorsed by Games Workshop. Any use of copyright and/ or trademark material is without authorization and in no way a challenge to the ownership of the property. Please don't sue me Games Workshop.
The picture on the left shows when things became ugly. The Lictor hopped the wall and engaged this Force Commander(Center). On the same turn, Old One Eye (left)popped out of the ground and took out the radar tower the next turn. A squad of 9 flying Warriors (Right) also entered the outpost on the same turn as Old One Eye. The next turn they assaulted the Chaplin on the Northern walkway.
The picture on the right shows the final matchup. The Chaplin took out the 9 Warriors, and the walls of the fort began to tumble down from the force of the Tyranid onslaught. The Chaplain and the few remaining Space Marines beat a hasty retreat to the nearest board edge (in order to win the scenario), but a brood of Genestealers and a Carnifex chewed everone to pieces. The Chaplain broke away, and when he was a mere 2" from the board edge, the winged Hive Tyrand rolled an 16" sweeping advance, catching the Champlain and ending his exsistance.
And yes, those large black things on either side of that Hive Tyrand are wings. His wingspan when the wings were completely outstretched was about 3 times his height. He also weighs about 3 pounds. He comes apart at the torso so his base can actually be engaged in close combat. He can give a squad of Space Marines a big "hug". He doesn't belong to me. He DOES belong to my brother, which is almost as good as belonging to me. But not quite.
This web page is in no way affiliated with or endorsed by Games Workshop. Any use of copyright and/ or trademark material is without authorization and in no way a challenge to the ownership of the property. Please don't sue me Games Workshop.
Tuesday, February 16, 2010
Pegasus Hobbies Barbed Wire Review
Today we're going to examine the Pegasus Hobbies Barbed Wire kit.
This product interests me because the box advertises over 29 feet of wire, and it's only $8.99 USD.
Let's open the box and see what we get...
We get three sprues of wire and three sprues of posts. The wire is very fine, and there is way more sprue here than there is product. It seems so wasteful, but I suppose that is the limits of the manufacturing process. They are soft plastic, maybe they can be recycled.
No instructions are included with the kit. It's been so long since I looked at the box and I don't have it handy; there may be instructions printed on the edges of the box lid.
Here is a bit of the wire with the posts. The wire is fairly flexable, and hair dryer, heat gun or a flame would help in warming the wire and allow you to bend it to shape and have it hold. The post come with hooks on them to attach the wire to.
Here is a close up of the wire. It is well detailed, and the flash and mold lines are not too bad. Which is good, because I think this would be near impossible to clean.
I have not had an opportunity to make anything from this wire yet, but to me it seems like this kit is a good deal. I'm confident that I will be picking up more of them.
Tamiya 1:48 Jerry Can Set Review
This time we will review the Tamiya 1:48 Jerry Can Set. This is a set that is useful for all kinds of gaming, from WWII up through near future to post apocalyptic, and even sci fi. This kit retails for $11.00 USD.

The box art shows us getting six barrels, 16 jerry cans, some stowage and a bucket. Let's see how much we actually get...
I got a bit carried away when I purchased this kit, and began assembling the barrels right away. We do get two sprues of accessories and an instruction sheet. This very well could have come with an ad for other 1:48 Tamiya kits, but if it did I have already tossed it out.
Here is a close up of one of the sprues. Though not pictured correctly, each sprue comes with enough parts to make six barrels; three American and three German. There are enough parts to build 16 jerry cans and 20 pieces of vehicle stowage.
The instructions are pretty straight forward, giving general info on the front and assembly instructions on the back. Note that there is a big difference between the American and German barrel. I didn't pay attention to what I was doing and assembled them some incorrectly. The lids are not interchangable and do not fit on each other well. Also, the jerry cans are 3 parts each; two halves and a handle. The handle is thin and fiddly and the cans take care to assemble correctly.
Here is a shot of a sprue with an Amazon Miniatures 25mm/ 28mm Secrets of the Shadow Reich figure and a 1:48 Lindberg Tiger I.
And here is a close up with just the Amazon figure.
Here we see the lovely Greta posing with a collection of the barrels. They look a bit small next to the model due to the thickness of her base. She is based on a Litko 25mm round.
And finally a close up of the jerry cans.
Again, the Tamiya kit gives you about double what is pictured on the packaging. It comes with tons of pieces for customizing and detailing vehicles in all kinds of genres, or anything else you'd want to use them for. This kit really is a good value.
Labels:
28mm,
40K,
Accessories,
Model Kit,
Modern,
Necromunda,
Review,
Sci Fi,
Wargaming,
WWII
Friday, January 22, 2010
Subscribe to:
Posts (Atom)