Tuesday, July 13, 2010

Razorwire

Razorwire is a basic piece of terrain necessary in many scenarios. It's also nice to put on the field to try and slow your opponent down!


I built six sections of razorwire, the maximum number of sections needed in a scenario. I used corrugated cardboard as the base, cutting it to 1" x 6". I then used masking tape to cover the edges and hide the corrugations.

My first attempt at razorwire was done like this:

I first cut short pieces of chopsticks to be used as the posts to mount the razorwire on. I then wrapped a heavy gauge length of floral wire around a medium sized marker. After this coil was created, I stretched it out and glued it to the posts on the cardboard. I then used a very light gauge wire to tie the razorwire to the posts. Once the glue was dry, the piece was sprayed with a black undercoat. The posts were drybrushed, starting with a dark brown and working up to a tan; the razorwire was drybrushed silver and given a rusty wash of burnt sienna.

After painting, two layers of flock were glued to the base.

After completing this single section, I bought 110 barbed wire fence pieces on ebay. They were cheap plastic ones from an old green-and-tan army man set. I used these to finish off my razorwire sections. They were cut to size and modified to fit onto a 6" long base and then cleaned of the excess flash and mold lines.

I then glued them to the base, primed black, and painted them as I did the other first section I made. The base was finished the same way.

It was actually faster to make the razorwire sections from scratch due to the modifications made to the purchased razorwire and the huge amount of flash on them. The purchased razorwire sections look much better than the home made piece, in my opinion.

Outpost

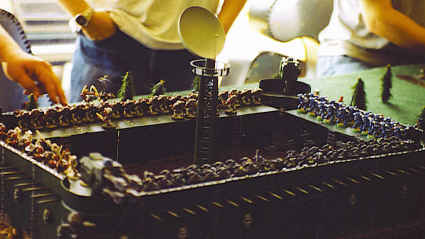
Here are some quick pictures of an outpost I built. It's based on a 20" x 30" sheet of foamcore. The battle being played is 2,000 points of Space Marines Vs. 4, 000 points of Tyranids. (Note: This is from 2004 or earlier.)


The picture on the left shows when things became ugly. The Lictor hopped the wall and engaged this Force Commander(Center). On the same turn, Old One Eye (left)popped out of the ground and took out the radar tower the next turn. A squad of 9 flying Warriors (Right) also entered the outpost on the same turn as Old One Eye. The next turn they assaulted the Chaplin on the Northern walkway.


The picture on the right shows the final matchup. The Chaplin took out the 9 Warriors, and the walls of the fort began to tumble down from the force of the Tyranid onslaught. The Chaplain and the few remaining Space Marines beat a hasty retreat to the nearest board edge (in order to win the scenario), but a brood of Genestealers and a Carnifex chewed everone to pieces. The Chaplain broke away, and when he was a mere 2" from the board edge, the winged Hive Tyrand rolled an 16" sweeping advance, catching the Champlain and ending his exsistance.


And yes, those large black things on either side of that Hive Tyrand are wings. His wingspan when the wings were completely outstretched was about 3 times his height. He also weighs about 3 pounds. He comes apart at the torso so his base can actually be engaged in close combat. He can give a squad of Space Marines a big "hug". He doesn't belong to me. He DOES belong to my brother, which is almost as good as belonging to me. But not quite.


This web page is in no way affiliated with or endorsed by Games Workshop. Any use of copyright and/ or trademark material is without authorization and in no way a challenge to the ownership of the property. Please don't sue me Games Workshop.

Warmachine Murder of Crows Template

Warmachine is one of the best skirmish- level fantasy/sci- fi games out there. Unfortunatly, the game can rely heavily on templated for weapons fire and "cloud effects," basically templates that remain in play. Instead of buying several sets of templates for this I decided to build one for my most commonly used cloud effect: The Old Witch of Khador's Murder of Crows. Template was originally supposed to be a joke using cheezy birds and springs.

The items used in the construction of the template are found to the right. They are:

1. Springs- These have a tight coil so they are resistant to permanent deformation when laid over. These were purchased at a surplus store called Ax- Man.

2. Doves- These are soft, plastic doves mounted on plastic, chrome plated rings. The doves slide right off, no cutting required. I picked these up at Michaels.

3. Doves on Springs- A combination of 1 and 2. More on this below.

4. Template Base- The template has a 5" diameter. A regular Gale Force 9 Warmachine round template was traced onto plastic card and carefully cut out with a sharp razor blade.

5. Doves on Springs on Base- 1 and 2 combined with 4. More below.

6. Old Witch- My unpainted Old Witch figure for size reference.

As stated above, the base was cut from about 1/8" plastic card. Each spring was cut into three pieces at various points to vary the height of the birds and to create a fuller effect. A bit of the coil on each spring was straightened and bent upwards to mount the birds to. This was insanely difficult due to the tight coils of the springs. Even with two pliers and a side cutter this was the most time consuming part.

Each dove have a hole in the bottom where it was mounted on its original ring. A bit of super glue was poured into the hole, then the bird was pressed onto the straightened coil of the spring. This offered a secure mount. On some doves, and additional bird was glued to its wing, to add more to the template without adding more springs.

Once the doves were attached to their springs, the springs were glued to the base. They were attached with superglue and randomly placed in such a way to allow the Old Witch to stand flat in between nearly any group of spings.

After the springs were attached and dry, the base was covered in white glue and regular sand was poured over it and allowed to dry.


With the sand in place the piece was primed black. The ground was drybrushed from a dark brown to tan. The crows (not doves because they're black now, not white) were lightly drybrushed with gray. The springs were left black.

The standard mix of flock was stuck down with white glue in patches. When it dried I used the template in a game. It was awesome.

The crows are a very soft plastic, so the paint flakes off easily. It is disappointing. The paint also seems to come off of the springs easily when they are bent. Maybe a couple heavy coats of sealant will help, but do to the flexible nature of the template, I have a feeling it won't.

Space Terrain- Space Hulk

This piece was built for a custom scenario I had written in which two opposing fleets must dock with a space hulk and retrieve ancient technology while duking it out. Unfortunatly the hulk is on a collision course with a planet so both side must act fast! A copy of the scenario can be downloaded here.


The model is a Gundam ship I picked up dirt cheap at Target. The model was distressed using mostly a soldering iron to melt holes all over. A hacksaw was used for more damage and also to seperate the small piece from the main ship. The detached portion, as well as the ship, were packed full of electrical wires and metal rods to simulate shredded corridors, power lines, etc.

The floating debris was mounted on small flight stands and the hulk itself is mounted on two large flight stands. The model was spray primed black. The enire thing was drybrushed white and details were picked out in yellow, red, blue and green. The large, melted piles were painted green as well as to give an impession of an alien or space bug infestation.

White batting (used for filling pillows and such) was used to simulate escaping gas from large holes.

Space Terrain- More Planets

Outer space doesn't have a lot of terrain features, but it does have planets. These planets were made using the same technique as the others on this site.

The only difference is the foam balls were cut in half. This allows twice as many planets per floral ball and also allows the planet to be removed from the board when ships move across them and replaced by a flat template.

The flat templates are pictures of planets from the internet sized appropriatly and printed out on heavy paper.

The tabletop that these pictures were taken on is simply a 4' x 6' sheet of black felt with paint spatter on it. A paintbrush was loaded with paint and I ran my fingers through the bristles to cause paint to spatter onto the felt. When the brush is not as wet you can also "fling" it at the felt to get more spatter.

Red and blue were also spattered but it does not show up very well. The light reflecting off of the felt gives the impression that there are way too much paint. In actuality it is much more sparse.

All in all it makes a very effective starfield for gameplay.

Space Terrain- Asteroids

This terrain was built for a local convention in January (2008). We hosted a couple space ship battle games. The first scenario required one fleet to escape from one board edge to the other while the opposing fleet had to stop them. The catch: a massive asteroid field ran down the middle of the board.

The asteroids were created by cutting out blocks of blue insulation foam and using my thumbnails to pry out chunks of the foam. If you plan on making as many as I did (50+) I would recommend using pink foam as it is less dense and maybe use a tool for the gouging to prevent a numb thumb.

The bases are actually Mage Knight figure bases. There are two styles of Mage Knight bases: the model is mounted on a small disk and the bottom "cup" snaps into that. The other base is the opposite. The base w/ the figure on it has a large window cut out of it so you can read the stat lines. The bases used here are the bottom "cups". The bases can be easily disassembled with a screwdriver.

A hole was drilled into each base to fit a length of floral wire through. The Mage Knight bases are nice because the clip on the bottom provides an easy way to make sure your holes are centered on the base. Lengths of floral wire were cut and one end was bent to an "L" shape. This allowed greater stability and glueing surface when the floral wire was pushed through the base.

The bases were spray primed black. The asteroids were given three coats of home-made textured paint. The asteroids were drybrushed from a dark grey to a white. The bases were left black because it's outer space. The asteroids were then jammed onto their base to create a hole. Then they were removed, a drop of white glue was put into the hole and they were mounted back on their base. the white glue actually adheres quite well. Do not use superglue; it melts foam!

Thursday, May 27, 2010

Flying Lead Starship Troopers Battle Report

I've flipped through my copy of Flying Lead, Ganesha Games excellent modern skirmish ruleset, several times but finally got around to playing and actual game.

For this outing I decided to try something a little different and broke out the Starship Troopers figs I had collecting dust on the shelf.

As the base book for Flying Lead deals strictly with modern combat, some additions had to be made to more accurately reflect Arachnid forces.  I borrowed some Special Abilities from Song of Blades and Heroes, using their listed points values as written in those rulebooks.

Mobile Infantry forces consisted of:
Sergeant- Q: 3  C: 2  SA: Leader  Equipment: TW-203-a Morita Assault Rifle, M-290 Flechette Grenade Launcher  Points: 136

Corporal- Q: 3  C: 2  SA: NCO  Equipment: TW-203-a Morita Assault Rifle, M-290 Flechette Grenade Launcher  Points: 126

Sniper- Q: 3  C: 2  SA: Sniper  Equipment: TW-201-I Morita Sniper Rifle  Points: 68

Missile Launcher- Q: 4  C: 2  SA: -  Equipment: SW-401 Longbow Missile Launcher  Points: 69

Nuke Bearer- Q: 4  C: 1  SA: -  Equipment: TW-203-a Morita Assault Rifle, M-290 Flechette Grenade Launcher, Pee Wee Nuke.  Points: 138

(x2) Veteran Rifleman- Q: 4  C: 3  SA:-  Equipment: TW-203-a Morita Assault Rifle, M-290 Flechette Grenade Launcher.  Points: 87

(x2) Rifleman- Q: 4  C: 2  SA:-  Equipment: TW-203-a Morita Assault Rifle, M-290 Flechette Grenade Launcher.  Points: 80

Arachnid forces consisted of:

Brain Bug- Q: 2  C: 0  SA: Leader, Burrowing, Big, Short Move  Equipment: -  Points: 50

Tanker- Q: 4  C: 6  SA: Vehicle, Huge, Burrowing, Fanatic, Slow  Equipment- Thick Armor (+5), Tanker Flame.  Points: 182

(x3) Hopper- Q: 4  C: 3  SA: Flying, Fanatic, Dashing  Equipment: Scything Talons.  Points: 57

(x10) Warriors- Q: 4  C: 3  SA: Burrowing, Climbing, Fanatic  Equipment: Scything Talons.  Points: 48

Weapon Stats are as so:

TW-203-a Morita Assault Rifle: Combat +2, Long Range, Select Fire, Move and Shoot  Points: 28

M-290 Flechette Grenade Launcher: Combat +2 first 2 range bands; Combat +1 third range band, Medium Range, Max Range 3 Med, Spread  Points: 15

TW-201-I Morita Sniper Rifle: Combat +2, Long Range, Sniper Scope  Points: 20

SW-401 Longbow Missile Launcher: Anti- Tank 5, Combat +2, Long Range, Priming Needed Crewed.  Points: 36

Pee Wee Nuke: Anti- Tank 8, Grenade Combat 5, High Tech Ammo, One Shot, Priming Needed, Lethal.  Points: 44

Scything Talons: Better Weapon Modifier 1, Lethal  Points: 3

Tanker Flame: Vehicle Flamethrower  Points: 45

My victim for this game was Todd, a veteran of our Song of Deeds and Glory campaign.  Already familiar with the engine, he was quickly up to speed on the rules (as well as I knew them.)

Todd chose to take control of the Arachnids, leaving me with the Mobile Infantry.

We deployed our units and Todd took the first turn.  He also started will all models burrowed that could.

The game started out quite uneventful, with both side failing a lot of activations.  We had learned our lesson from the SDG campaign, both of us playing warbands that were not entirely Q: 2 models, and rolled one or two dice often.  This still did not make models move any faster.

A few turns into the game, and the action is just starting to heat up.  No casualties for either side, yet.

My Sergeant grabbed the missile launcher team, a vet and a regular and tried to move up the flank to intercept the tanker.  The missile launcher is the only weapon on the table that can hurt the tanker bug and I wanted to make sure it was in position to pop the tanker as soon as it surfaced.  The NCO commanded the sniper and two more troopers and simply moved to the center of the board to lay down fire on anything that came into view.  They were positioned on the hill to make it as difficult as possible for the Arachnids to engage them in hand to hand while still maintaining maneuverability.

The Arachnids seemed to have a simple plan; advance underground and spring up at the last minute.  Their advance was generally straight forward, with the hoppers starting to cross to the opposite side of the table from which they started.


The Sergeant and his men watch for signs of the approaching tanker bug.

The hoppers and brain bug continued to plod up the field.  One hopper directed it's attention to the missile launcher team, trying to eliminate the biggest threat.  The other two began maneuvering to flank the NCO and her men. 

A hopper is knocked down by heavy Morita fire.


Hoppers maneuver to the flank.

The Mobile Infantry NCO and her men held their dune, laying down overwatch and firing on anything that reared it's head.  The Sniper really showed it's value early on, dropping all three hoppers, but not before a hopper claimed the life of one of the Sergeant's rifleman. 


The sniper aims up on a hopper bug.


With the aerial threat eliminated, the NCO held her ground in the center of the board, while the Sergeant slowly pulled back as the tanker advanced.  Tired of the plodding pace of his Warriors, Todd began to surface them and move across the surface. The brain bug remained under the surface, and simply stopped about a long move distance from the NCO.  What was he up to?

The continued advance...

A wide shot of the battle so far.

Eventually the Sergeant and his men took shelter in the bunker near their deployment zone as the tanker drew ever closer.  The NCO's unit continued to whittle away at the approaching bugs, the sniper racking up many more kills with his Lethal ability.

And then the Mobile Infantry's worst nightmare arrived...

The tanker bug attempted and activation on three dice and passed all three!  It moved forward, surfaced, and let loose a stream of hellfire on the Sergeant's men in the fortification.
A devastating flame attack from the tanker bug...

And the expected result.

The missile launcher and the nuke bearer were eliminated by the gout of flame.  The leader actually survived and recoiled over the wall of the bunker.

Things were looking grim for the Mobile Infantry.  With the only weapon able to kill the tanker bug in the clutches of a dead man, some desperate measures had to be taken.  The Sergeant jumped back into the bunker and made a dive for the Longbow missile launcher.  Following the Sergeant's lead, the other trooper went for the Pee Wee Nuke.  Weapons in hand, they needed another turn before they could actually fire the weapon.  If they got another turn...

The NCO and her men continued to hold off the center, with the Warrior growing ever closer, and ever bolder.

On the Arachnid turn the Warriors continued to maneuver around the Mobile Infantry.  Again the tanker threw 3 dice for activation... and failed them all!  This gave the Sergeant the opportunity to load the nuke into the launcher and let loose, vaporizing the tanker bug!
Even giant bugs curl up on their back when they die!

With the threat of the tanker eliminated the sergeant turned his attention to helping the NCO in the center of the board.  It was too late, and Warrior erupted from the ground and eliminated her.  The remaining MI began to retreat to the Sergeant's bunker, with Warriors picking them apart as they fled.


MI attempt to fall back to cover, but are cut off.

The final showdown began, with only 4 MI defending the bunker against two Warriors and the still burrowing Brain bug.  Some poor activations allowed the Arachnids to close with the Mobile Infantry in the bunker.  The Brain bug finally surfaced to lend the Quality bonus to the remaining Warriors.

Chaos in the bunker!

The sniper was able to break away from the melee and pop the Brain bug with a well placed shot.  The Sergeant was eliminated by a Warrior in hand to hand.  Some morale checks eliminated a few models, and eventually the Mobile Infantry watched the last Arachnid Warrior flee from the battlefield!

This was great fun, and a lot was learned about the rules by both of us. 

Caught up in the heat of the game, we did forget a few special abilities here and there, which would have helped both sides at times.  Another read through of the rules, and more familiarity with the rosters will help for next time.

There was some discussion regarding the stats of the models, most notably adding communicators to the MI, Arachnids, or both.  This would certainly make the Arachnids more devastating, allowing them to move quickly underground and to keep their leader completely safe from the MI while the other bugs do their worst. 

I also noticed the Pee Wee Nuke didn't have a Combat bonus, which made HE shots with it fairly ineffective.

A little tweaking here and there and we'll give it another whirl.  My goal is to make this a very solid demo scenario for conventions.  I think it has potential.  Everyone playing and watching had a great time!