Tuesday, July 13, 2010

Statue Bunker

This piece is terrible.  I post it now only for completeness, and because some of the technique is interesting.

This was another piece created for my desert terrain set. It is also another piece created from an X-Men playset. I wish more K-Marts would have a 90% off going out of business sale. This tends to be a favorite piece when people see my terrain. Components used in the construction of this piece are:

Foamcore Textured Spraypaint
Cardboard for the base Sand for ground cover
Cross Stitching grid sheet Netting
Styrofoam/ Stryofoam ball Toothpicks


The first thing to do was to disassemble the playset. It was a Statue of Liberty head with a bunch of crazy anti-mutant traps and gizmos inside it. Pretty stupid, actually. I can see why I paid 50 cents for it. I reduced the playset to just the face of the statue and cut it in half at an angle. I then used a dremel tool to distress the features slightly. Using the statue as a guide I cut a base from double corrugated cardboard and sealed the edges with masking tape. The statue was hot glued to the base.

I then used a textured spraypaint (I can't remember the brand or type) and covered the piece heavily. After waiting for eons for it to dry, I base coated it in a brown. Then I highlighted to a light brown into a cream into a light cream color.

The interior floors were made from foamcore sealed with masking tape, and then Cross Stitching plastic (aka Granny Grating) was cut to size and superglued on. a block of styrofoam was used to support the lower floor, and a frame was made out of toothpicks to support the upper floor. After construction, these platforms were spraypainted black (the styrofoam was brushed black first, of course) and everything was drybrushed in a silver. The platforms were glued into place inside the statue.

The base was then coated in a water/PVA mix and then the piece was covered in fine sand. When the glue dried the excess was removed and the process was repeated again.

The cactus was made from a small styrofoam ball used in floral arrangments with toothpicks jammed in and glued into place. The cactus was then painted green, washed black and the spines were painted red.

Skull Piles

These skull piles are hydrostone pieces I picked up at discount from an unknown manufacturer a long time ago. The skulls were simply inked with a Flesh Wash and the ground inked with a Brown Ink. The skulls were then drybrushed a tan to Bleached Bone to a white. The ground was drybrushed a dark brown to a light brown to tan. A bit of my super secret ground cover mix* was attached with white glue and they were done.

* Super secret ground cover mix is Woodland Scenics green fine turf, Woodland Scenics dark green static grass, Woodland Scenics light green static grass, Woodland Scenics light brown fine turf and ground, dried tea leaves. Mix according to taste.

Razorwire

Razorwire is a basic piece of terrain necessary in many scenarios. It's also nice to put on the field to try and slow your opponent down!


I built six sections of razorwire, the maximum number of sections needed in a scenario. I used corrugated cardboard as the base, cutting it to 1" x 6". I then used masking tape to cover the edges and hide the corrugations.

My first attempt at razorwire was done like this:

I first cut short pieces of chopsticks to be used as the posts to mount the razorwire on. I then wrapped a heavy gauge length of floral wire around a medium sized marker. After this coil was created, I stretched it out and glued it to the posts on the cardboard. I then used a very light gauge wire to tie the razorwire to the posts. Once the glue was dry, the piece was sprayed with a black undercoat. The posts were drybrushed, starting with a dark brown and working up to a tan; the razorwire was drybrushed silver and given a rusty wash of burnt sienna.

After painting, two layers of flock were glued to the base.

After completing this single section, I bought 110 barbed wire fence pieces on ebay. They were cheap plastic ones from an old green-and-tan army man set. I used these to finish off my razorwire sections. They were cut to size and modified to fit onto a 6" long base and then cleaned of the excess flash and mold lines.

I then glued them to the base, primed black, and painted them as I did the other first section I made. The base was finished the same way.

It was actually faster to make the razorwire sections from scratch due to the modifications made to the purchased razorwire and the huge amount of flash on them. The purchased razorwire sections look much better than the home made piece, in my opinion.

Outpost

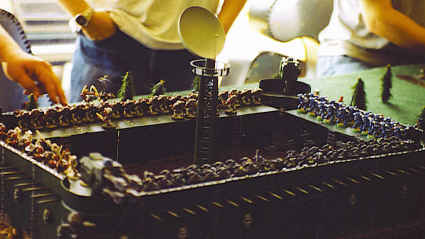
Here are some quick pictures of an outpost I built. It's based on a 20" x 30" sheet of foamcore. The battle being played is 2,000 points of Space Marines Vs. 4, 000 points of Tyranids. (Note: This is from 2004 or earlier.)


The picture on the left shows when things became ugly. The Lictor hopped the wall and engaged this Force Commander(Center). On the same turn, Old One Eye (left)popped out of the ground and took out the radar tower the next turn. A squad of 9 flying Warriors (Right) also entered the outpost on the same turn as Old One Eye. The next turn they assaulted the Chaplin on the Northern walkway.


The picture on the right shows the final matchup. The Chaplin took out the 9 Warriors, and the walls of the fort began to tumble down from the force of the Tyranid onslaught. The Chaplain and the few remaining Space Marines beat a hasty retreat to the nearest board edge (in order to win the scenario), but a brood of Genestealers and a Carnifex chewed everone to pieces. The Chaplain broke away, and when he was a mere 2" from the board edge, the winged Hive Tyrand rolled an 16" sweeping advance, catching the Champlain and ending his exsistance.


And yes, those large black things on either side of that Hive Tyrand are wings. His wingspan when the wings were completely outstretched was about 3 times his height. He also weighs about 3 pounds. He comes apart at the torso so his base can actually be engaged in close combat. He can give a squad of Space Marines a big "hug". He doesn't belong to me. He DOES belong to my brother, which is almost as good as belonging to me. But not quite.


This web page is in no way affiliated with or endorsed by Games Workshop. Any use of copyright and/ or trademark material is without authorization and in no way a challenge to the ownership of the property. Please don't sue me Games Workshop.

Warmachine Murder of Crows Template

Warmachine is one of the best skirmish- level fantasy/sci- fi games out there. Unfortunatly, the game can rely heavily on templated for weapons fire and "cloud effects," basically templates that remain in play. Instead of buying several sets of templates for this I decided to build one for my most commonly used cloud effect: The Old Witch of Khador's Murder of Crows. Template was originally supposed to be a joke using cheezy birds and springs.

The items used in the construction of the template are found to the right. They are:

1. Springs- These have a tight coil so they are resistant to permanent deformation when laid over. These were purchased at a surplus store called Ax- Man.

2. Doves- These are soft, plastic doves mounted on plastic, chrome plated rings. The doves slide right off, no cutting required. I picked these up at Michaels.

3. Doves on Springs- A combination of 1 and 2. More on this below.

4. Template Base- The template has a 5" diameter. A regular Gale Force 9 Warmachine round template was traced onto plastic card and carefully cut out with a sharp razor blade.

5. Doves on Springs on Base- 1 and 2 combined with 4. More below.

6. Old Witch- My unpainted Old Witch figure for size reference.

As stated above, the base was cut from about 1/8" plastic card. Each spring was cut into three pieces at various points to vary the height of the birds and to create a fuller effect. A bit of the coil on each spring was straightened and bent upwards to mount the birds to. This was insanely difficult due to the tight coils of the springs. Even with two pliers and a side cutter this was the most time consuming part.

Each dove have a hole in the bottom where it was mounted on its original ring. A bit of super glue was poured into the hole, then the bird was pressed onto the straightened coil of the spring. This offered a secure mount. On some doves, and additional bird was glued to its wing, to add more to the template without adding more springs.

Once the doves were attached to their springs, the springs were glued to the base. They were attached with superglue and randomly placed in such a way to allow the Old Witch to stand flat in between nearly any group of spings.

After the springs were attached and dry, the base was covered in white glue and regular sand was poured over it and allowed to dry.


With the sand in place the piece was primed black. The ground was drybrushed from a dark brown to tan. The crows (not doves because they're black now, not white) were lightly drybrushed with gray. The springs were left black.

The standard mix of flock was stuck down with white glue in patches. When it dried I used the template in a game. It was awesome.

The crows are a very soft plastic, so the paint flakes off easily. It is disappointing. The paint also seems to come off of the springs easily when they are bent. Maybe a couple heavy coats of sealant will help, but do to the flexible nature of the template, I have a feeling it won't.

Space Terrain- Space Hulk

This piece was built for a custom scenario I had written in which two opposing fleets must dock with a space hulk and retrieve ancient technology while duking it out. Unfortunatly the hulk is on a collision course with a planet so both side must act fast! A copy of the scenario can be downloaded here.


The model is a Gundam ship I picked up dirt cheap at Target. The model was distressed using mostly a soldering iron to melt holes all over. A hacksaw was used for more damage and also to seperate the small piece from the main ship. The detached portion, as well as the ship, were packed full of electrical wires and metal rods to simulate shredded corridors, power lines, etc.

The floating debris was mounted on small flight stands and the hulk itself is mounted on two large flight stands. The model was spray primed black. The enire thing was drybrushed white and details were picked out in yellow, red, blue and green. The large, melted piles were painted green as well as to give an impession of an alien or space bug infestation.

White batting (used for filling pillows and such) was used to simulate escaping gas from large holes.

Space Terrain- More Planets

Outer space doesn't have a lot of terrain features, but it does have planets. These planets were made using the same technique as the others on this site.

The only difference is the foam balls were cut in half. This allows twice as many planets per floral ball and also allows the planet to be removed from the board when ships move across them and replaced by a flat template.

The flat templates are pictures of planets from the internet sized appropriatly and printed out on heavy paper.

The tabletop that these pictures were taken on is simply a 4' x 6' sheet of black felt with paint spatter on it. A paintbrush was loaded with paint and I ran my fingers through the bristles to cause paint to spatter onto the felt. When the brush is not as wet you can also "fling" it at the felt to get more spatter.

Red and blue were also spattered but it does not show up very well. The light reflecting off of the felt gives the impression that there are way too much paint. In actuality it is much more sparse.

All in all it makes a very effective starfield for gameplay.