Showing posts with label WIP. Show all posts

Friday, July 1, 2011

Easy Roads

For some time I've been trying to come up with a simple, easy and cheap method for creating roads for my games.  I wanted them to be flexible to conform to terrain, as well as be easy to transport.

A friend of mine had come up with a great idea using some offcut rubber strip he got from a customer a long time ago.  I wanted to have roads like these, but the material he used was not readily available.

I finally figured out a good way to do what I like to call "Dan roads".

The roads are made from Con- Tact Premium Grip Liner.  I picked this up at the local DIY store.  I would imagine this could be found pretty much anywhere.  It is a textured, rubber mat about 1/8" thick and comes in a 4' roll.  The roll is 18" wide.


I simply slid back the outer wrapper to expose as much liner as I needed for the width of my road and started slicing through with a sharp utility knife.  I then learned there is a cardboard spool in the center, and a layer of clear plastic as well.  The spool slid out easy enough, and cutting continued. 

I measured the width of my roads based on the size of a 15mm infantry base.  I also didn't use a straight edge, so the road edge came out uneven.  For me this is OK because it will look more like a dirt road.  For city streets I would use more care to make sure the edge was true.

Once cutting was done I unrolled the pieces and gave them a generous coat of dark brown acrylic paint.  I then hung them to dry.  The pictures shows them drying.  I painted them one half at a time for ease of handling.  It is a rubber material, so the paint didn't cover that well.  I used cheap craft paint, so I was not worried about using too much and slathered it on.

A light brown/ tan was then streaked and drybrushed over the brown.  The liner has just enough texture to pick up from some drybrushing, which looks OK for a dirt road in 6- 15mm, and would look pretty good for asphalt in larger scales.  A bit of off white was then lightly drybrushed  onto the roads, and they were finished.

Here are a few shots of the finished roads in use. 

The roads are stored rolled up.  The end in the center of the roll curls very hard, causing it to bow up from the table.  I think alternating the direction the roads are rolled up will help them lay flat in the future.

 A detail shot of the road.

Overall I like the way they turned out.  There is a good cost/ time/ detail ratio with these roads.  I'm just curious now as to how well the paint will hold up to the rigors of gaming.

Tuesday, March 8, 2011

Cheap Wood Houses

I picked this up this past Saturday when checking out Michaels for craft projects for my daughter.

It is a Creatology Ranch House Wooden Puzzle.  It cost me $1.00 US.

It looks like it's scaled OK for 1/72.  It took about 10 minutes to assemble; no glue required.


The pieces come on two wooden sheets.  You simple punch them out and slide the tabs together.  They may make a nice framework from which to create your own house.  The shingles, windows and doors are printed on in black.  There isn't a whole lot of detail.


The chimney is the worst part.  Not bad for $1, but is it worth the effort to detail up and repaint?  We'll see one day...

Wednesday, July 14, 2010

Warjack Fueling Station- Construction

I built this as something quick for May-June Terragenesis Terrain Competition. The only requirement was that it had to fit onto a CD. After finishing the tedious and not- too- creative Axis and Allies Miniatures terrain, I needed to build something. This is what I came up with.

I play Warmachine but know little about the background story. I figured warjacks are steam powered and have a boiler, so they would have to lug around water to create steam. Right? So this is a water fueling station. Or it could be the largest keg in the Iron Kingdoms. Either way I'm happy. Click pictures for larger views.

Starting components: CD, Bottle bottom, beads and pumping mechanism.

The core of the project, or "water tank", is the bottom half of a contact lense saline bottle. This was hot glued to the CD. A pumping arm was built from two lengths of drinking straw and two plastic card pieces cut to size. The grommets at the bottom of the pump pistons are donut- shaped beads.

The roof is made from the top, tapered portion of the bottle. The nozzle was cut off and an old hatch from a GW Rhino glued into place. The entire piece was hot glued into place.

The fueling nozzle and regulator are made from the exhaust off of a Ferrari model. This was mounted onto a piece of thin card glued to the tank. Another piece of card was attached next to the pump to accomate an instrument cluster. The three gauges are made from lights from a model car.

The verticle pipes are simply drinking straws. Rivets were punched out of thin plastic with a leather punch and glued into place with super glue. These were used on the mounting plates for the instrument cluster and fueling regulator, as well as on the pump mechanism. Valve handles on the top hatch, verticle pipes and fueling nozzle are nylon snaps for womens clothing.

A bead of hot glue was run down the seams on the top and sides of the tank to simulate a weld. This was also done around where the verticle pipes attach to the tank. The ladder is a modified MegaBloks Dragons toy.

The base is simply covered in sand attached with white glue.

Friday, December 25, 2009

Jungle Terrain- Construction


I had been stockpiling plastic jungle trees and fake plants for some time before I decided that I should actually build something out of them to make room for more junk.  I took some in- progress shots of these pieces while I was building them.

There are a total of 9 pieces in the jungle terrain set. 8 of them are based on old AOL CDs and one is a foam hill.

This is an example of a typical piece. The plastic jungle trees are Games Workshop. They were cleaned and assembled as normal. The leaves were given a green wash and the trunks were given a brown wash.


The CDs were prepped by covering the hole with masking tape. The GW trees were then superglued into place and various plant parts were attached to the base with hot glue. White glue was used to attach pebbles to the bases. These pebbles were obtained by sifting regular playgound sand through a collander.

This man-eating plant is actually the head of a Resident Evil toy. It is made of hollow, soft rubber so it was filled with plaster of paris and allowed to dry so it would hold its shape. More plastic plants were glued on and a plastic vine was placed around a tree stump which is actually part of the arm of the same toy. The hard, plastic stump was washed with brown ink. The man- eating plant was not washed because the rubber would not take ink. It just pooled up and looked crappy.


These two tall trees were made from the same Resident evil toy. The top portions are the toy's arms and the bottom is the toy's root- like feet. The two parts were simply pinned together and the joint was resculpted to look like one continuous piece. The trees were given a brown wash and more vines were glued up their length to help hide the joints of the former arms and legs.


I wanted to create a stagnant pond in the jungle set. This was done by cutting a piece of coruugated cardboard to fit on the CD and then cutting the pond out of the center. Bits of cardboard were used to fill in the area around the tree roots. The carboard was simply hot glued into place.


Wall filler was used to cover the cardboard and to give the pond bed a more even transition from the cardboard edge to the bottom of the CD. It also hides the corrugations of the cardboard.


Here is a shot of my old "workbench" (which was really a $15 Walmart desk) during the project.

Wednesday, December 9, 2009

Rocks and Boulders

We decided to have a terrain making night at Village Games in Anoka, MN in preparation for our upcoming Song of Blades and Heroes campaign.  The plan was to do two things that were quick and easy.  The first of these were large rocks and boulders.

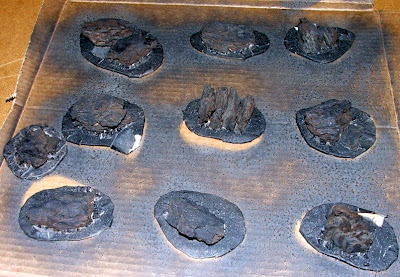
We started off with some tree bark garden filler.  Many of these pieces look like slate and other kinds of rock.  It just needs paint.  Some of the pieces were cut, smashed and broken up to create different shapes.  Many of the pieces were cut in half with a saw, and then the cut was sanded flat to allow the bark to stand upright.


Once our rock formations were created they were laid out on corrugated cardboard and traced around.  These shapes were then cut out to be used as bases for our rocks.  Masking tape was applied to the edges to cover the corrugations, and white glue was used to attach the bark to the bases.  Small pebbles were glued down around the base of the bark as well.


Once the glue was dry the pieces were primed black with spray paint.  We picked one of the worst times to do this; it was dark and cold,  and it was in the middle of a very windy, heavy snowfall.  I would never prime miniatures in this weather, but as this was going to be drybrushed terrain I was not as concerned.  The coverage was OK, but the tape on a few of the piece got wet and began peeling up. 


This is as far as we were able to get.  Once the pieces are painted and based there will be more pictures.