Showing posts with label Battletech. Show all posts

Sunday, October 25, 2015

Trees for Battletech

Being a cheap gamer, I am always looking for ways to get nice looking terrain and scenery for little money.  I've seen pipe cleaner trees many times, and made some in the past from bump chenille.  I didn't like how these turned out, so I'm tackling them in a different way.

I prefer my trees to be based individually and be placed on a template, as I will use them for Battletech and other 6mm gaming.

Unfortunately these pictures turned out terribly, but they will still convey the basic process.

Start off with two regular pipe cleaners.  Brown or black is the best to use, but I've picked up all kinds of colors for very little money, so I will be using a variety.  An advantage to building these trees is that I can grind through TV shows on the DVR with my girlfriend and still get some projects done.


Twist the pipe cleaners together to form the trunk of the tree.  A bit will also be needed to attach the tree to a base.


Loop the long ends back to the trunk.  These loops will form the bulk of the trees branches and foliage.  When I do this I use it to create 4 "branches."  


Loosely twist the loops together to create branches.  


Roll the branches up towards the trunk.  


Use a lighter or other controlled flame to melt the chenille fibers on the trunk.  It stinks and is probably toxic (I'm guessing they are made of polyester), so do what you feel you need to do to protect yourself.  Don't apply too much heat or the fibres will liquify and drip off, leaving just twisted wire.  You want just enough heat to melt the fibers.  If you're really tough you can roll the trunk in your fingers immediately after melting the fibers to smooth it out.  It is hot though and may burn you, so touch at your own risk!


This completes the basic construction of a tree armature.  The steps below will lay out painting and flocking trees.  I am using a red tree as a test because I want to see if I need to dye the odd- colored trees before flocking and painting.  This tree is also a bit bulkier than the one in the example above because an extra pipe cleaner was used in bulking out the branches and foliage.

Start off by painting the trunk.  Use whatever tree colors you prefer.  I am using Delta acrylic paint, Burnt Umber.  This is cheap craft paint readily available at Wal Mart or any craft store (Michaels, Jo Anne Ect., Hobby Lobby, etc.)  I went pretty heavy to soak up and cover the red colors.  Coverage was adequate.


Insert the tree into your preferred base.  In my case I am reusing the bases from my previous tree project.  They are made from 40mm poker chips.  In Minnesota thrift stores always have poker chips, and they go for $1- $3 for 100 of them.  They make great bases for models and terrain.  These chips were primed black and based with my standard mix.  A hole the size of the tree trunk was drilled in the center.  The tree was then super- glued into place.  As you see in the picture the trunk pokes through the base a good amount.  When the glue is dry, clip this off flush with the bottom of the base.


The top of the tree is then coated in a liberal amount of white glue.  I made sure to completely saturate the fibers.  I then rolled it in Woodland Scenics Course Turf, then squished it in.  I then tapped off the excess.  Despite the heavy coverage, the red underneath still shows true.  The fibers will have to be colored ahead of time.  Spray paint might work.  Dyeing it black with watered down paint might work too.  I am going to mix black paint in with the white glue and see if I can dye and glue the turn down at the same time.


A picture of the tree on one of my typical woods templates with a Dragon and Jenner from the Introductory Box Set.  I will post more pictures as the experiments continue.


Thursday, December 24, 2009

Rough Ground

Rough going represents terrain that is hard to move through and fight in, but does not block line of sight.


These templates are made of foamcore. On three of the pieces the edges were cut at an angle to make a smoother transition from terrain to tabletop. The largest piece was left with the edges squared. The edges were taped to protect the exposed foam. Smaller templates were made from thin cardboard as well with the edges masked off as usual.


Small stones were glued in piles on the foamcore templates with white glue. Large glass-type fragments (for fish aquariums) were glued onto the smaller templates in piles.

The rocks were painted black and drybrushed from dark grey to white, except for the large template. The large templates were based in a light brown.


Static grass was glued onto the templates; the larger templates recieving two applications.

The seperatly- based rock piles are placed on the templates to fill them out, but are easily moved around for the placement of troops.

Hills

I've done all kinds of hills, for all sorts of games.  Nothing ever really fancy. 

These hills were made for use in Battletech.  They are simply 3/4" white insulation foam cut to shape with a large razor or box cutter, painted black and flocked.  These are nice because it is obvious where the elevations are, like a contour map.  They are not the most visually appealing.


This hill is made in the same way.  The shapes were cut out using a cheap hot wire cutter from Michaels.  There are layers of 3/4" foam stacked on top of each other; pinned together using toothpicks and glued together with white glue.  The hill was painted black, coated in white glue, and coated in regular old playground sand.  Once dry it was drybrushed progressively lighter shades of brown.


Here are more hills done in a similar style.  The desert ones are made by glueing two 3/4" pieces of white foam together and cutting the shape out with a razor blade.  A hot wire cutter was then used to carve in the rock face.  The hill was painted black, and the rock face was drybrushed. grey and white.  Regular fine terrarium sand was glued to the tops.


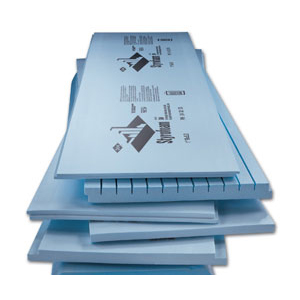
These hills are carved from some scraps of 2" thick blue insulation foam, but in all other ways made the same way as the desert ones above.  I much prefer this to the white foam as it doesn't make such a mess when cutting.  Instead of sand on the top I used green ground cover, or flock.


Here is yet another hill with a rock face.  This one is different and has a sloping back side.  Blue or pink insulation foam is good for these kinds of hills because you can rough cut it with a razor or hot wire cutter, then sand it smooth.  The photograph is of some testing I did on this piece by painting the hill green first, and some different types of flock.  It didn't turn out well.  The hill now has my traditional ground cover on it.


The last two examples of hills I have are of more finish, natural flowing hills.  Except for this one:

A 3" piece of pink insulation foam, cut to shape with a razor blade and sanded smooth.  I painted it black, and flocked it wiht my standard mix.  With this piece I also coated the flock with a layer of white glue to make it more durable.  This hill is hard as a rock, and very rough to the touch. 

Here are some smaller hills from blue foam for my 15mm WWII skirmish.


Wednesday, December 16, 2009

Rocks and Boulders Completed

Last night my friend Todd finished up the boulder project that was started last week.


He started off by applying a heavy drybrush of brown paint.  This gives the rocks a more natural look when finished.  He then drybrushed them a dark grey, a light grey, and finally a light touch of white.


The bases were flocked with my standard ground cover mixture and white glue.


I love this project.  it was so quick and easy, and the end result is very nice.

Wednesday, December 9, 2009

Hills for Song of Blades and Heroes

This is the second quick terrain project from the terrain night at Village Games in Anoka, MN.  We are preparing for our Song of Blades and Heroes campaign, and terrain from each player is required.

Hills will be covered later on this blog, so here's a quick rundown:

These hills are made from 3/4" thick expanded polystyrene-  It's the white foam that leaves those little beads all over the place.  It's not my preferred material, but I had quite a bit lying around the house.  Extruded is better; it's easier to shape, sand, paint,etc.  This is the stuff that usually comes in pink or blue.


We simply drew the shape we wanted our hills to be on the foam in black marker and cut it out with a utility knife.  And sharp edges or rough spots were cleaned up.  The pieces were then brush painted black and left to dry. 


Once almost dry, a thich layer of white glue was applied to the hills and a generous coating of ground cover was applied.  The excess was tapped off, and the hill was allowed to dry overnight.


Rocks and Boulders

We decided to have a terrain making night at Village Games in Anoka, MN in preparation for our upcoming Song of Blades and Heroes campaign.  The plan was to do two things that were quick and easy.  The first of these were large rocks and boulders.

We started off with some tree bark garden filler.  Many of these pieces look like slate and other kinds of rock.  It just needs paint.  Some of the pieces were cut, smashed and broken up to create different shapes.  Many of the pieces were cut in half with a saw, and then the cut was sanded flat to allow the bark to stand upright.


Once our rock formations were created they were laid out on corrugated cardboard and traced around.  These shapes were then cut out to be used as bases for our rocks.  Masking tape was applied to the edges to cover the corrugations, and white glue was used to attach the bark to the bases.  Small pebbles were glued down around the base of the bark as well.


Once the glue was dry the pieces were primed black with spray paint.  We picked one of the worst times to do this; it was dark and cold,  and it was in the middle of a very windy, heavy snowfall.  I would never prime miniatures in this weather, but as this was going to be drybrushed terrain I was not as concerned.  The coverage was OK, but the tape on a few of the piece got wet and began peeling up. 


This is as far as we were able to get.  Once the pieces are painted and based there will be more pictures.

Thursday, October 15, 2009

Epic 40K Ruins

These ruins are made from the Games Workshop Epic 40,000 plastic ruins.  They are all based on cardboard with the edges covered with masking tape to hide the corrugations. Random pieces from my bits box have been added, as well as a bunch of sprue rubble. The bases were coated in textured paint, and the pieces were primed black. Painting was a very basic drybrush of dark gray, to gray to white.

6mm

These Middle Eastern buildings consist of several mud huts and what was called "Saddam's Palace" on the packaging. All the pieces were cast in an orange, high density plaster.


Each piece was covered in brown ink, then drybrushed brown, tan, Bleached Bone, and finally white.

The water in the palace courtyard was inked blue and given a coat of brush on gloss. The domes were painted gold and given a black ink wash to pick out the details. The window lattice was painted silver.

The white building is the American White House. It was primed black, then drybrushed gray, light gray and then white. The roof was drybrushed a dark gray. The windows were painted using a jeweled effect.


The bunker is a resin piece based on a hex. It was primed black. I first drybrushed the turret GW Boltgun Metal. I then drybrushed the bunker dark gray to a light gray, with a final drybrush of white. I then blacked out the doors and windows. The ground was then drybrushed a dark brown, brown and then a light coat of tan. Small bits of ground cover were glued in low traffic areas, like the edges of the bunkers.


The beacon/ pillar things and the hab- dome were primed black. They were then drybrushed dark gray, light gray and a light coat of white. Various waterslide transfers were added to the beacons, and the windows and door of the dome were painted with the same type of jeweled effect.


If anyone knows who the manufacturer of any of these pieces is, please let me know!  Thanks!

Monday, October 12, 2009

Battletech Repair Bay

This piece is based on a Three- Mile Island nuclear power plant model. This kit is also "N" scale like the Factory. The main building of the kit is as it came, but the dome was cut nearly in half to accommodate a repair gantry. Most of the other parts were left out and added to the (at that time) tiny bits box.


The main building and rear platform were assembled per the instructions. The dome was cut in half and glued to the center of the rear platform. A piece of card had to be glued into the floor to cover the hole inside the floor of the dome. Though difficult to see in the pictures, thin wire was laid into the grooves of the dome and glued into place to give a tube frame- like look. The smokestack was also glued through a hole in the dome.

A hill was cut out of 3/4" foam and made to fit snugly against the side of the building and platform. I was trying to make it look like it was built on the side of a hill. A ramp was also made out of foam leading up to the repair bay dome.

The repair bay was built from some pieces of sprue, toothpicks and card. Some microchips and electrical connectors are also lying inside the bay. LEDs were glued to the roof of the main building to allow the roof to be easily removed. Course sand was glued to the roof of the building as well as on the ramp and platform.

The piece was primed white. The stone and asphalt areas were painted black and drybrushed to white. The bay interior was drybrushed silver. The bay and building were then given a rusty colored wash and a purplish wash (which turned out very purple in these pictures.) The dome exterior was painted an olive drab green and highlighted with a lighter green. The floor of the bay was painted gray with a spotty white highlight applied. Wash was added to the floor to look like oil and chemical spills.
The hills and ground were flocked and some lichen was used as bushes.


All in all I think this piece turned out fairly well. The hills don't fit the buildings as well as they should and the bay is just a bit too small for anything but the light 'mechs.

Battletech Factory

This factory was built from an inexpensive model kit purchased in the local model supply shop. I don't know the manufacturer's name, but I do know that it came in a simple plastic bag with instructions. The kit is surprisingly well made; with all of the pieces fitting together very well. It is an "N" scale building, which is too large for Battletech normally, but I wanted my buildings to be large enough to place Battlemechs inside.


The model was assembled per the instructions and based on a piece of double- corrugated cardboard. Masking tape was used to hide the corrugations. The original roof was thin plastic card which was replaced with a much heavier card.


Some capacitors and LEDs were glued to the loading dock to represent cargo. Plastic tubes were attached to the roof as chimneys. They also act as a handle to remove the roof.
The piece was primed black, base coated, washed in black and given various shades of drybrushing. The base was also flocked with green ground cover and some lichen was used for bushes. Railroad ballast was glued to the roof and to the base as walkways and driveways.